The default .htaccess file in WordPress is one of the core files which comes with WordPress. The .htaccess file is used to enable various WordPress features such as permalinks, caching, and redirects.
It is common for WordPress users like us to delete it accidentally or misconfigure the rules which are present in this file while adding something to it. This can lead to broken permalinks or even 500 internal server error on our WordPress websites.
It is also possible for various misbehaving or untested plugins to corrupt the .htaccess file by writing their own rules in it and breaking your website in the process.
In case your website is also not working due to some problem with the .htaccess file, then the following article will show how you can recreate and restore the default WordPress .htaccess file and get your WordPress website up and running again.
What is a .htaccess file?

The .htaccess (hypertext access) file is a configuration file that allows you to override settings in your main server configuration files for the Apache web server and other servers that use Apache’s htaccess commands.
In most cases, the .htaccess file is located in the web root of your website. It contains directives intended to be executed by the Apache web server when it receives requests from browsers on behalf of all users.
Usually, the .htaccess file is used to customize the behavior of your website, commonly the directory on the Apache web server, without affecting other users. This allows each user to have their own .htaccess file settings. The .htaccess file is never used to store user-specific information such as session data, login information, etc.
What is the Use of .htaccess File in WordPress?
When it comes to WordPress, the .htaccess file is mainly used to handle the site’s permalink structure, but as we already discussed, .htaccess also allows you to modify the web server in a number of ways, so many plugins use it for their own purposes, such as:
- Optimize the website’s performance by configuring caching
- Prevent access to the administrative interface or specific pages
- Set up 301 redirects
- Redirecting HTTP to HTTPS automatically
- Redirect users to another URL or subdomain
- Restrict or ban certain IP addresses
- Increasing the max upload size
Now we know why the .htaccess file is used in WordPress, it’s time to learn how to restore it if you somehow deleted or damaged it.
✍️ Author’s Note
In order to save you from having to recreate the default .htaccess file in WordPress, I want to point out that most hosting providers keep a backup of your .htaccess file in the .htaccess.bak format. Therefore, I recommend checking your website root folder for any .bak files. If you find any, simply delete the corrupted .htaccess file and rename the .htaccess.bak as .htaccess, and your website will probably work again.
How to Recreate the Default WordPress .htaccess File
There are two easiest ways to create the default WordPress .htaccess File. One method is to use the WordPress internal feature to create the file for you automatically, while another method is to create and paste the code manually into the file.
1. Automatically Creating WordPress .htaccess File
In most cases, the WordPress admin panel (wp-admin) is accessible even if the default WordPress .htaccess file data has been deleted or corrupted. Hence, check if the admin panel is accessible and if so, follow the steps given below.
- Install any File Manager Plugin and delete the damaged .htaccess file. (Skip this method if the file is already deleted)
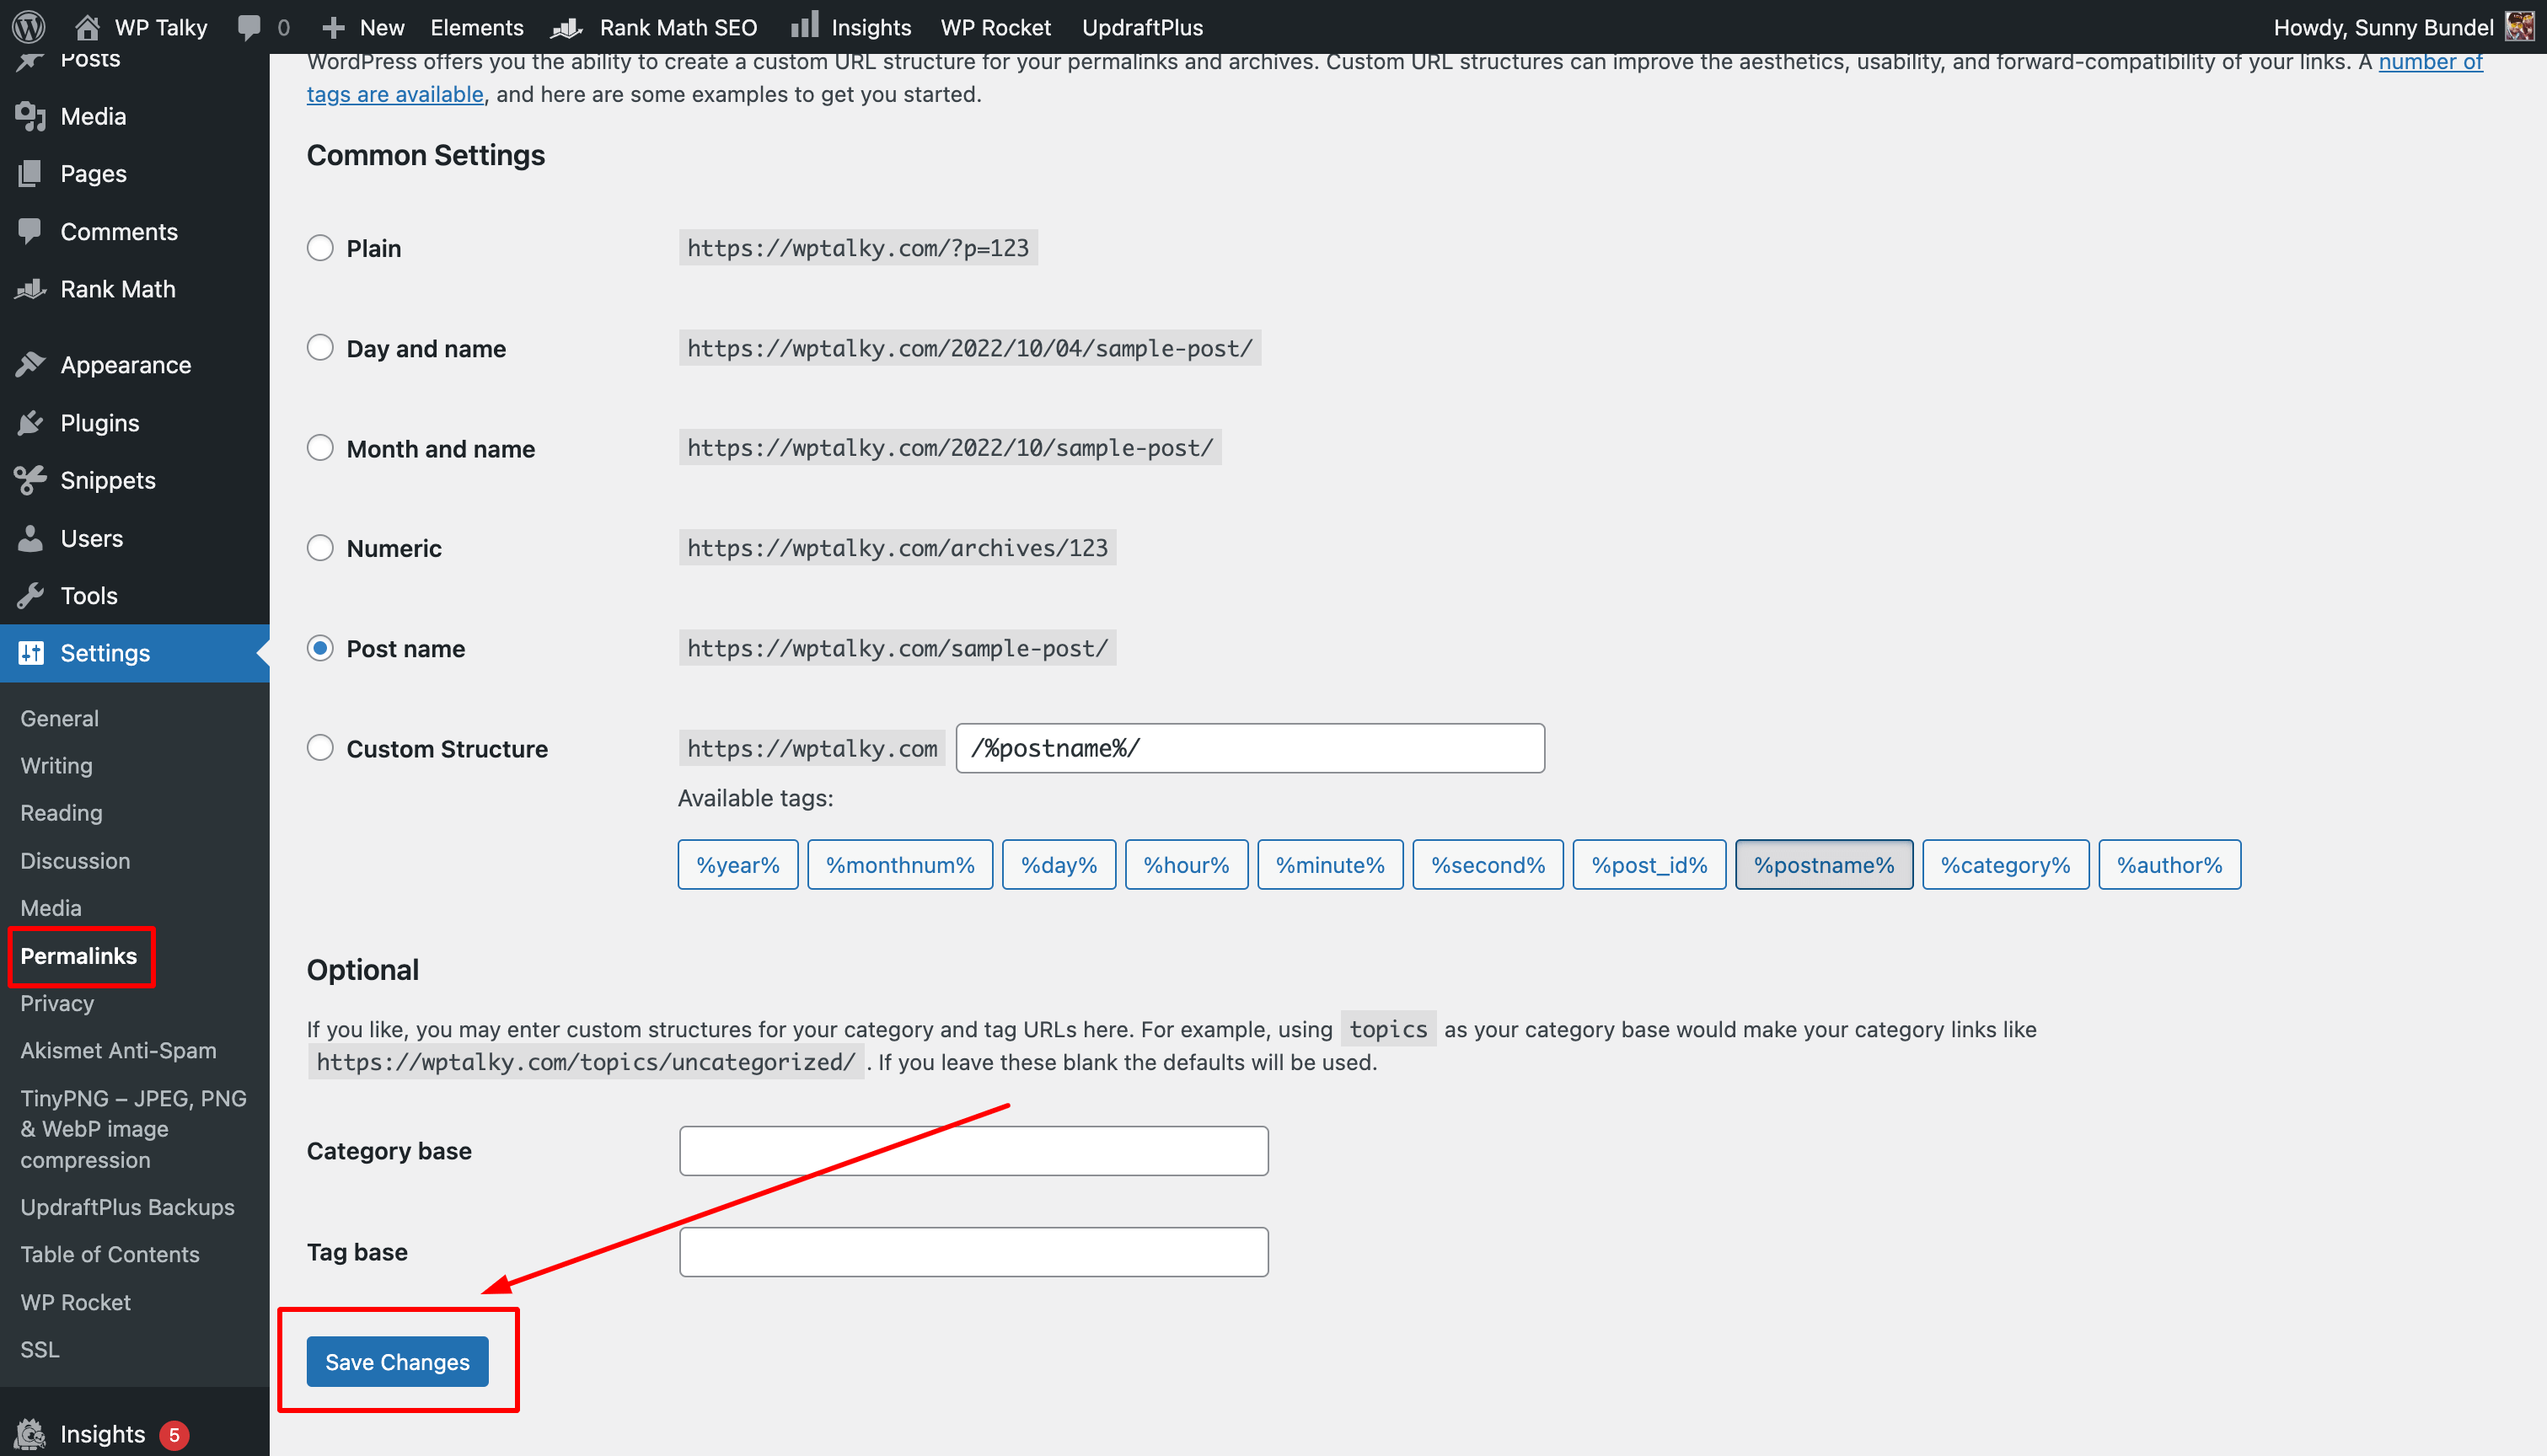
- Go to Settings > Permalinks and Click on Save Changes Without updating anything inside it.
Automatically Create .htaccess File in WordPress - The WordPress default .htaccess file will automatically be generated by WordPress.
If the admin panel is not accessible, then you can go to the second method.
2. Manually Creating WordPress File
In this method, we will manually create the .htaccess file from scratch. It is easy to recreate the default WordPress .htaccess file. All you need is the access to your web panel or FTP. Make sure you have the login details with you, then follow the steps given below.
First of all, log in to your web panel or FTP account and navigate to the root directory of your website. If you are using a web panel such as cPanel, aapanel, or VestaCP, you will find the .htaccess file inside the public_html or www folder.
In most web panels, the htaccess file is hidden by default, so you must make it visible before making changes. For cPanel users, go to Settings and choose Show Hidden Files (dotfiles), as shown in the screenshot below.

Replace the old .htaccess file with .htaccess.old (or anything else you like), then create a new blank file named .htaccess and save it.
Ensure that the file is inside the WordPress root directory (the directory which contains the wp-admin, wp-includes and wp-content folders).
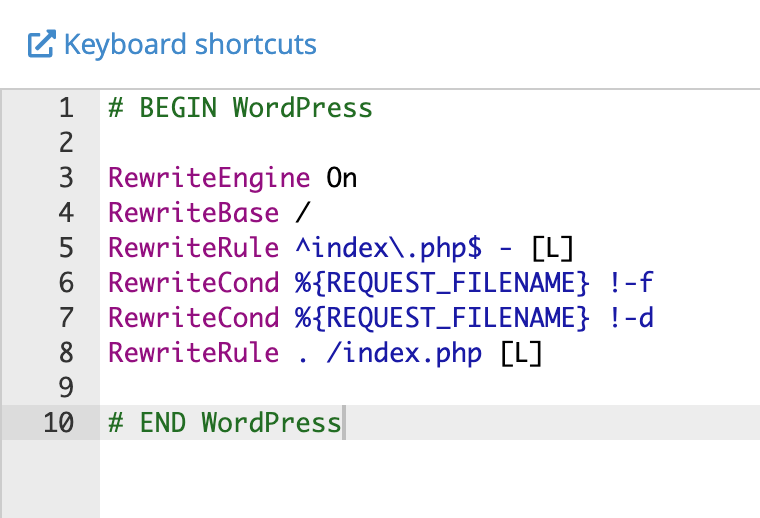
Now open the file editor available in your web panel and copy the .htaccess file default code given below. Here are three common WordPress .htaccess file codes:
Basic WordPress Default .htaccess File
This default WordPress .htaccess file works with all WordPress websites that are not using the multisite feature.
# BEGIN WordPress
RewriteEngine On

RewriteRule .* - [E=HTTP_AUTHORIZATION:%{HTTP:Authorization}]

RewriteBase /

RewriteRule ^index\.php$ - [L]

RewriteCond %{REQUEST_FILENAME} !-f

RewriteCond %{REQUEST_FILENAME} !-d

RewriteRule . /index.php [L]
# END WordPress
This is a basic .htaccess file that comes with the WordPress installation and allows you to access the permalink structure of your WordPress site.
WordPress Default .htaccess for Multisite
There are two types of .htaccess files that are used in multisite WordPress environments. The first one is for multisite, which uses a subfolder structure, and the second is for multisite, which uses a subdirectory structure. Choose the one which meets your requirements.
.htaccess for Multisite Using Subfolders
If you’re using a subfolder multisite structure, copy the .htaccess code given below and paste it into the .htaccess file which we created in the previous step.
# BEGIN WordPress Multisite

# Using subfolder network type: https://wordpress.org/support/article/htaccess/#multisite
RewriteEngine On

RewriteRule .* - [E=HTTP_AUTHORIZATION:%{HTTP:Authorization}]

RewriteBase /

RewriteRule ^index\.php$ - [L]
# add a trailing slash to /wp-admin

RewriteRule ^([_0-9a-zA-Z-]+/)?wp-admin$ $1wp-admin/ [R=301,L]
RewriteCond %{REQUEST_FILENAME} -f [OR]

RewriteCond %{REQUEST_FILENAME} -d

RewriteRule ^ - [L]

RewriteRule ^([_0-9a-zA-Z-]+/)?(wp-(content|admin|includes).*) $2 [L]

RewriteRule ^([_0-9a-zA-Z-]+/)?(.*\.php)$ $2 [L]

RewriteRule . index.php [L]
# END WordPress Multisite
.htaccess for Multisite Using Subdomains
If you’re using a subdomain multisite structure for your WordPress, copy the .htaccess code given below and paste it into the .htaccess file which we created in the previous step.
# BEGIN WordPress Multisite

# Using subdomain network type: https://wordpress.org/support/article/htaccess/#multisite
RewriteEngine On

RewriteRule .* - [E=HTTP_AUTHORIZATION:%{HTTP:Authorization}]

RewriteBase /

RewriteRule ^index\.php$ - [L]
# add a trailing slash to /wp-admin

RewriteRule ^wp-admin$ wp-admin/ [R=301,L]
RewriteCond %{REQUEST_FILENAME} -f [OR]

RewriteCond %{REQUEST_FILENAME} -d

RewriteRule ^ - [L]

RewriteRule ^(wp-(content|admin|includes).*) $1 [L]

RewriteRule ^(.*\.php)$ $1 [L]

RewriteRule . index.php [L]
# END WordPress Multisite
Note:
Remember that the .htaccess file is only used only in the apache server. Therefore, if you’re using any server other than apache and facing an error on your WordPress site, then it might not be due to the .htaccess file.
What to Do After Restoring Default .htaccess File in WordPress
After you have created the default .htaccess file in WordPress, it’s time to check for all the settings and plugins which you have installed on your website.
I would advise you to remove and reinstall all the plugins which you think are using the .htaccess file, such as cache plugins, SEO plugins, SSL plugins, or anything else. Reinstalling those plugins will re-generate all the settings that those plugins have previously made in the .htaccess file.
You can also look for codes that are available inside the backup file which we created (.htaccess.bak) for various rules that you were using before and create them again.
Frequently Asked Questions
These are some of the most common questions people ask about WordPress .htaccess file:
What will happen if I delete the .htaccess file from my WordPress?
WordPress default .htaccess file is responsible for the permalink. So you will not be able to visit any of your published articles if you delete the .htacess file.
Why I am getting an internal server error in WordPress?
This usually happens when your .htaccess file contains an error or misconfiguration. Even a simple dot (.) can also cause a 500 internal server error when placed inside the .htaccess file.
Wrapping Up!
The .htaccess is a powerful file that can control your WordPress website in complex ways. It’s a simple, easy-to-use, and powerful file. But you need to remember that it can easily make your website inaccessible if you remove or replace the default code with your own rules.
In this article, we saw how to restore the default WordPress .htaccess file. I hope that you have learned something new through this article, and I welcome your valuable feedback in the comments section below.


